PT2258 Arduino Library for 24-Channel Digital Volume Controller

You can control up to 24 channel with four PT2258 ICs. DaacWaves has developed a PT2258 Arduino Library to control these four PT2258 ICs. That library is presented here for you.
The basic Arduino code for using this library is also provided in this article, and I have included the PT2258 IC's introduction in this with you can check this IC's datasheet also.
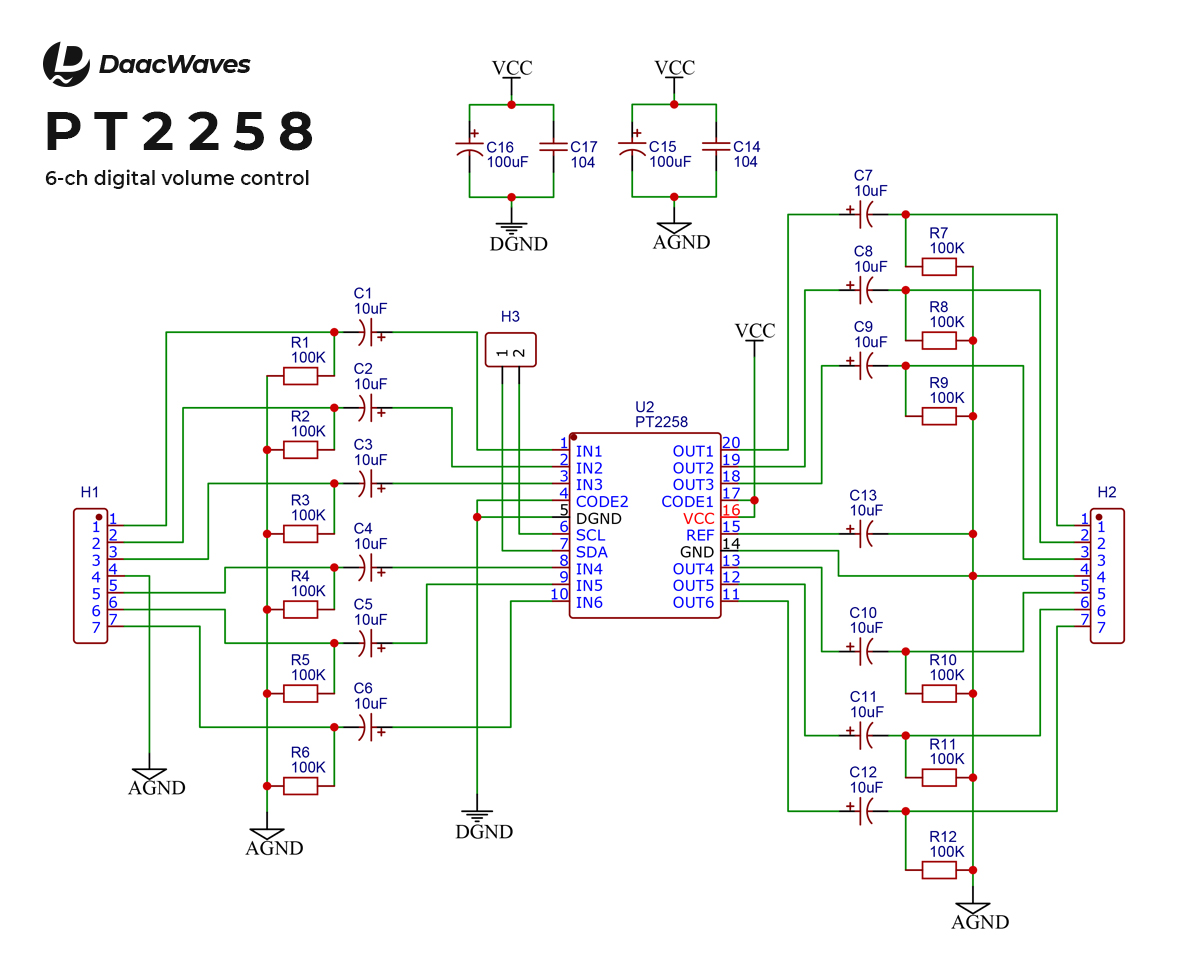
Introduction to the PT2258 IC
PT2258 is a 6-channel digital volume controller IC. Its operating voltage is 5 to 9VDC. Attenuation Range is 0 to -79dB at 1dB/step. The PT2258 IC communicates through an I2C Control Interface. It has four selectable Address. This IC have 20 pins, available in DIP or SOP.
I2C Control Interface
Data are sent from the microcontroller to the PT2258 through the SDA and SCL. The SDA and SCL make up the BUS Interface. The SDA and SCL are should be connected to the positive supply voltage through pull-up resistors.
Let's See How to Select a Address
The addresses are selected by the CODE1 and CODE2 pins of the IC. If Vcc is connected to the CODE1 or CODE2, it is set to "1". If the ground is connected, it is set to "0". Please refer to the below information:
Address 1:
CODE1 = 1 and CODE2 = 1
Then the PT2258's Address is 10001100
Address 2:
CODE1 = 1 and CODE2 = 0
Then the PT2258's Address is 10001000
Address 3:
CODE1 = 0 and CODE2 = 1
Then the PT2258's Address is 10000100
Address 4:
CODE1 = 0 and CODE2 = 0
Then the PT2258's Address is 10000000
Data Table
Function Bits
| MSB | LSB | FUNCTION | ||||||
|---|---|---|---|---|---|---|---|---|
| 1 | 1 | 1 | 0 | A3 | A2 | A1 | A0 | 6-Channel, -1dB/step |
| 1 | 1 | 0 | 1 | 0 | B2 | B1 | B0 | 6-Channel, -10dB/step |
| 0 | 0 | 0 | 1 | A3 | A2 | A1 | A0 | Channel No. 3, -1dB/step |
| 0 | 0 | 0 | 0 | 0 | B2 | B1 | B0 | Channel No. 3, -10dB/step |
| 0 | 0 | 1 | 1 | A3 | A2 | A1 | A0 | Channel No. 4, -1dB/step |
| 0 | 0 | 1 | 0 | 0 | B2 | B1 | B0 | Channel No. 4, -10dB/step |
| 0 | 1 | 0 | 1 | A3 | A2 | A1 | A0 | Channel No. 2, -1dB/step |
| 0 | 1 | 0 | 0 | 0 | B2 | B1 | B0 | Channel No. 2, -10dB/step |
| 0 | 1 | 1 | 1 | A3 | A2 | A1 | A0 | Channel No. 5, -1dB/step |
| 0 | 1 | 1 | 0 | 0 | B2 | B1 | B0 | Channel No. 5, -10dB/step |
| 1 | 0 | 0 | 1 | A3 | A2 | A1 | A0 | Channel No. 1, -1dB/step |
| 1 | 0 | 0 | 0 | 0 | B2 | B1 | B0 | Channel No. 1, -10dB/step |
| 1 | 0 | 1 | 1 | A3 | A2 | A1 | A0 | Channel No. 6, -1dB/step |
| 1 | 0 | 1 | 0 | 0 | B2 | B1 | B0 | Channel No. 6, -10dB/step |
| 1 | 1 | 1 | 1 | 1 | 0 | 0 | M | 6-Channel, Mute When M= 1, Mute On When M=0, Mute Off |
Attenuation Unit Bit
| A3 | A2/B2 | A1/B1 | A0/B0 | Attenuation Value(dB) |
|---|---|---|---|---|
| 0 | 0 | 0 | 0 | 0/0 |
| 0 | 0 | 0 | 1 | -1/-10 |
| 0 | 0 | 1 | 0 | -2/-20 |
| 0 | 0 | 1 | 1 | -3/-30 |
| 0 | 1 | 0 | 0 | -4/-40 |
| 0 | 1 | 0 | 1 | -5/-50 |
| 0 | 1 | 1 | 0 | -6/-60 |
| 0 | 1 | 1 | 1 | -7/-70 |
| 1 | 0 | 0 | 0 | -8/- |
| 1 | 0 | 0 | 1 | -9/- |
PT2258 Arduino Library
Two files need for the library. First one is PT2258.h, this is a Header file and second one is PT2258.cpp, this is a Source file. Both file codes are given below. Please create the library with these.
PT2258.h
/*
  PT2258.h - Library
  DaacWaves <https://daacwaves.blogspot.com/>, November 27, 2022
*/

#ifndef PT2258_H
#define PT2258_H

#include <Arduino.h>

void set_address(int address);
void pt2258();
void set_mas(int mas_vol);
void set_ch1(int ch1_vol);
void set_ch2(int ch2_vol);
void set_ch3(int ch3_vol);
void set_ch4(int ch4_vol);
void set_ch5(int ch5_vol);
void set_ch6(int ch6_vol);
void pt2258_send(char d, char e);
void set_mute(int mute);

#endif
PT2258.cpp
/*
  PT2258.h - Library
  DaacWaves <https://daacwaves.blogspot.com/>, November 27, 2022
*/

#include <Arduino.h>
#include <Wire.h>
#include "PT2258.h"

int a, b, c;
char ic_address;

void set_address(int address) {
  switch (address) {
    case 1: ic_address = 0b1000110; break; // CODE1-1 CODE2-1 (Vcc is 1, Gnd is 0)
    case 2: ic_address = 0b1000100; break; // CODE1-1 CODE2-0 (Vcc is 1, Gnd is 0)
    case 3: ic_address = 0b1000010; break; // CODE1-0 CODE2-1 (Vcc is 1, Gnd is 0)
    case 4: ic_address = 0b1000000; break; // CODE1-0 CODE2-0 (Vcc is 1, Gnd is 0)
  }
}

void pt2258() {
  for (int i = 1; i < 5; i++) {
    set_address(i);
    Wire.beginTransmission(ic_address);
    Wire.write (0b11000000);
    Wire.endTransmission();
  }
}

void set_mas(int mas_vol) {
  c = 79 - mas_vol;
  a = c / 10;
  b = c - a * 10;
  for (int i = 1; i < 5; i++) {
    set_address(i);
    pt2258_send(0b11010000 + a, 0b11100000 + b); // All CH
  }
}

void set_ch1(int ch1_vol) {
  c = 79 - ch1_vol;
  a = c / 10;
  b = c - a * 10;
  pt2258_send(0b10000000 + a, 0b10010000 + b); // CH1
}

void set_ch2(int ch2_vol) {
  c = 79 - ch2_vol;
  a = c / 10;
  b = c - a * 10;
  pt2258_send(0b01000000 + a, 0b01010000 + b); // CH2
}

void set_ch3(int ch3_vol) {
  c = 79 - ch3_vol;
  a = c / 10;
  b = c - a * 10;
  pt2258_send(0b00000000 + a, 0b00010000 + b); // CH3
}

void set_ch4(int ch4_vol) {
  c = 79 - ch4_vol;
  a = c / 10;
  b = c - a * 10;
  pt2258_send(0b00100000 + a, 0b00110000 + b); // CH4
}

void set_ch5(int ch5_vol) {
  c = 79 - ch5_vol;
  a = c / 10;
  b = c - a * 10;
  pt2258_send(0b01100000 + a, 0b01110000 + b); // CH5
}

void set_ch6(int ch6_vol) {
  c = 79 - ch6_vol;
  a = c / 10;
  b = c - a * 10;
  pt2258_send(0b10100000 + a, 0b10110000 + b); // CH6
}

void pt2258_send(char d, char e) {
  Wire.beginTransmission(ic_address);
  Wire.write (d);
  Wire.write (e);
  Wire.endTransmission();
}

void set_mute(int mute) {
  for (int i = 1; i < 5; i++) {
    set_address(i);
    Wire.beginTransmission(ic_address);
    switch (mute) {
      case 0: Wire.write (0b11111000); break; // mute disabled
      case 1: Wire.write (0b11111001); break; // mute
    }
    Wire.endTransmission();
  }
}
Arduino
/*
  PT2258 digital volume controller
  DaacWaves <https://daacwaves.blogspot.com/>, November 27, 2022
*/

#include <Wire.h>
#include <PT2258.h>

void setup() {
  Wire.begin();
  Serial.begin(9600);

  pt2258(); //Clear the register must be transmitted first
  controller();

}

void loop() {
  /*
     Example of all channel controlling

    if(digitalRead(8) == LOW) {
    mas_vol++;
    set_mas(mas_vol);
    delay(300);
    }
    if(digitalRead(9) == LOW) {
    mas_vol--;
    set_mas(mas_vol);
    delay(300);
    }
  */

  /*
     Example of Individual channel controlling

    if(digitalRead(8) == LOW) {
    ch1_vol++;
    set_address(1);
    set_ch1(ch1_vol);
    delay(300);
    }
    if(digitalRead(9) == LOW) {
    ch1_vol--;
    set_address(1);
    set_ch1(ch1_vol);
    delay(300);
    }
  */

}

void controller() {

  set_mute(0); //0 = unmute, 1 = mute

  //Channel volume - Select any one All channel or Individual channel
  //All channel volume - Volume range is 0 to 79
  int mas_vol = 0; // This is not master volume
  set_mas(mas_vol);

  //Individual channel volume - Volume range is 0 to 79
  //Address1
  int ch1_vol = 50;
  set_address(1);
  set_ch1(ch1_vol);

  int ch2_vol = 50;
  set_address(1);
  set_ch2(ch2_vol);

  int ch3_vol = 50;
  set_address(1);
  set_ch3(ch3_vol);

  int ch4_vol = 50;
  set_address(1);
  set_ch4(ch4_vol);

  int ch5_vol = 50;
  set_address(1);
  set_ch5(ch5_vol);

  int ch6_vol = 50;
  set_address(1);
  set_ch6(ch6_vol);

  //Address2
  int ch7_vol = 50;
  set_address(2);
  set_ch1(ch7_vol);

  int ch8_vol = 50;
  set_address(2);
  set_ch2(ch8_vol);

  int ch9_vol = 50;
  set_address(2);
  set_ch3(ch9_vol);

  int ch10_vol = 50;
  set_address(2);
  set_ch4(ch10_vol);

  int ch11_vol = 0;
  set_address(2);
  set_ch5(ch11_vol);

  int ch12_vol = 0;
  set_address(2);
  set_ch6(ch12_vol);

  //Address3
  int ch13_vol = 50;
  set_address(3);
  set_ch1(ch13_vol);

  int ch14_vol = 50;
  set_address(3);
  set_ch2(ch14_vol);

  int ch15_vol = 50;
  set_address(3);
  set_ch3(ch15_vol);

  int ch16_vol = 50;
  set_address(3);
  set_ch4(ch16_vol);

  int ch17_vol = 50;
  set_address(3);
  set_ch5(ch17_vol);

  int ch18_vol = 50;
  set_address(3);
  set_ch6(ch18_vol);

  //Address4
  int ch19_vol = 50;
  set_address(4);
  set_ch1(ch19_vol);

  int ch20_vol = 50;
  set_address(4);
  set_ch2(ch20_vol);

  int ch21_vol = 50;
  set_address(4);
  set_ch3(ch21_vol);

  int ch22_vol = 50;
  set_address(4);
  set_ch4(ch22_vol);

  int ch23_vol = 50;
  set_address(4);
  set_ch5(ch23_vol);

  int ch24_vol = 50;
  set_address(4);
  set_ch6(ch24_vol);
}
This is the basic Arduino code for this library. You can develop with this.
How this Arduino library works
You can use this single library for all addresses. Please refer to the following code in the library.
Address
This is the address selecting function in the library.
void set_address(int address) {
  switch (address) {
    case 1: ic_address = 0b1000110; break;
    case 2: ic_address = 0b1000100; break;
    case 3: ic_address = 0b1000010; break;
    case 4: ic_address = 0b1000000; break;
  }
}
You can call in the Arduino like this "set_address()"
Clear Register
First the register needs to be cleared in the PT2258. If the register is not clear, the sound out will not work correctly. For that "0b11000000" must be sent first. Please check the below function.
void pt2258() {
  for (int i = 1; i < 5; i++) {
    set_address(i);
    Wire.beginTransmission(ic_address);
    Wire.write (0b11000000);
    Wire.endTransmission();
  }
}
All addresses must be cleared. So here I run the code four times. Every time the address changes.
Volume Control
PT2258 could control 6 channels together or individual channels only. Please refer to the above Data Table table.
This is the 6 channel volume controlling code in this library. This is not a master volume.
void set_mas(int mas_vol) {
  c = 79 - mas_vol;
  a = c / 10;
  b = c - a * 10;
  for (int i = 1; i < 5; i++) {
    set_address(i);
    pt2258_send(0b11010000 + a, 0b11100000 + b); // All CH
  }
}
Since the volume needs to be changed at four addressed, to the code is run four times as mentioned above.
These are the individual volume controlling functions.
void set_ch1(int ch1_vol) {
  c = 79 - ch1_vol;
  a = c / 10;
  b = c - a * 10;
  pt2258_send(0b10000000 + a, 0b10010000 + b); // CH1
}

void set_ch2(int ch2_vol) {
  c = 79 - ch2_vol;
  a = c / 10;
  b = c - a * 10;
  pt2258_send(0b01000000 + a, 0b01010000 + b); // CH2
}

void set_ch3(int ch3_vol) {
  c = 79 - ch3_vol;
  a = c / 10;
  b = c - a * 10;
  pt2258_send(0b00000000 + a, 0b00010000 + b); // CH3
}

void set_ch4(int ch4_vol) {
  c = 79 - ch4_vol;
  a = c / 10;
  b = c - a * 10;
  pt2258_send(0b00100000 + a, 0b00110000 + b); // CH4
}

void set_ch5(int ch5_vol) {
  c = 79 - ch5_vol;
  a = c / 10;
  b = c - a * 10;
  pt2258_send(0b01100000 + a, 0b01110000 + b); // CH5
}
Here I was writing 6 channel control code only. Not needed to select the addresses here. It should be selected in the Arduino code.
Check the below function in the library. This function is that sends the volume data to the PT2258 IC.
void pt2258_send(char d, char e) {
  Wire.beginTransmission(ic_address);
  Wire.write (d);
  Wire.write (e);
  Wire.endTransmission();
}
Mute
The final is the Mute function. Needs to be muted at four addresses also.
void set_mute(int mute) {
  for (int i = 1; i < 5; i++) {
    set_address(i);
    Wire.beginTransmission(ic_address);
    switch (mute) {
      case 0: Wire.write (0b11111000); break; // mute disabled
      case 1: Wire.write (0b11111001); break; // mute
    }
    Wire.endTransmission();
  }
}
These are the functions in this library
Youtube Video
Conclusion
This is my successful experiment. I think this code to simplify a lot.


