Overview of ATmega328 and Arduino Bootloader Installation

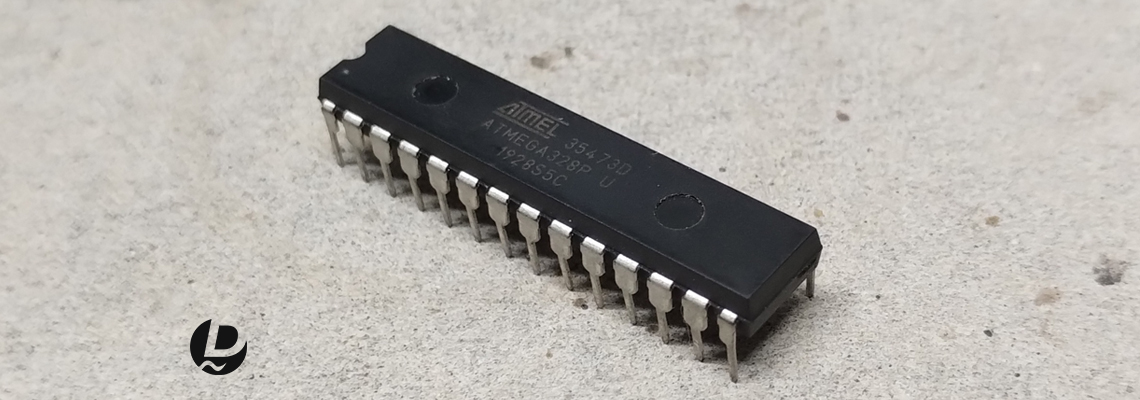
The ATmega328 microcontroller is the heart of many popular Arduino boards, known for its versatility and ease of use. One of the key elements that make Arduino accessible to beginners and enthusiasts is the Arduino bootloader. In this guide, we'll provide an overview of the ATmega328 and walk you through the process of installing the Arduino bootloader.
Section 1: Understanding the ATmega328
The ATmega328 is an 8-bit microcontroller based on the AVR (Advanced Virtual RISC) architecture. It comes with various features, including:
- CPU: 8-bit AVR microcontroller with 32KB of Flash memory for program storage, 2KB of SRAM for data storage, and 1KB of EEPROM for non-volatile data storage.
- Clock Speed: It can operate at speeds up to 20 MHz using an external crystal oscillator or an internal oscillator.
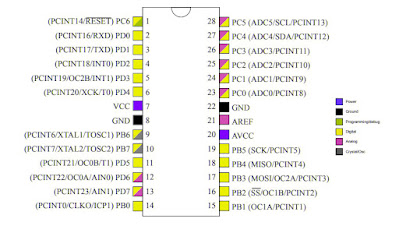
- I/O Pins: It has 23 general-purpose I/O pins, including digital and analog pins, which can be used for various purposes like reading sensors, driving LEDs, or interfacing with other devices.
- Peripherals: It includes features like timers/counters, USART (UART), SPI, I2C (TWI), PWM channels, and more, which make it versatile for a wide range of applications.
- Power Management: It offers multiple power-saving modes, including idle, ADC noise reduction, power-down, and power-save mode.
- Voltage Regulator: The ATmega328 includes an internal voltage regulator, allowing it to operate with a wide range of supply voltages (typically 1.8V to 5.5V).
- Programming: You can program the ATmega328 using popular programming languages like C/C++ and use various development environments, including the Arduino IDE.
Section 2: What is an Arduino Bootloader?
An Arduino bootloader is a small piece of firmware or code that is pre-installed on the microcontroller (such as the ATmega328) used in Arduino boards. Its primary purpose is to facilitate the easy uploading of sketches (Arduino programs) to the microcontroller using a serial connection (typically over USB) without requiring a dedicated hardware programmer.
Key Functions and Features:
- Sketch Upload: The bootloader allows you to upload your Arduino sketches to the microcontroller over a serial interface without the need for specialized programming hardware. This simplifies the programming process and makes it more user-friendly.
- Serial Communication: The bootloader listens for incoming serial communication on a specific port (usually the USB port) when the microcontroller is connected to a computer. It recognizes the special signals sent by the Arduino IDE during the upload process.
- Fuse Configuration: The bootloader often sets certain configuration fuses on the microcontroller to specify clock sources, startup delays, and other parameters. These fuses are typically set in a way that ensures the microcontroller can be programmed easily using a 16 MHz crystal oscillator.
- Optiboot: Arduino boards commonly use the Optiboot bootloader, which is a lightweight and faster alternative to the older Arduino bootloader. Optiboot allows for quicker sketch uploads and conserves memory space.
Section 3: Getting Ready for Bootloader Installation
The Arduino bootloader is typically pre-installed on Arduino boards that use ATmega microcontrollers. However, if you are working with a standalone ATmega microcontroller or need to reinstall the bootloader for any reason, here are the general steps for bootloader installation:
Requirements:
- An ATmega microcontroller (e.g., ATmega328) that does not already have a bootloader.
- An AVR programmer (e.g., Arduino as ISP, USBasp) or another Arduino board acting as a programmer.
- Arduino IDE or compatible software installed on your computer.
Steps:
- Connect Your Programmer: Ensure that your AVR programmer is correctly connected to the ICSP (In-Circuit Serial Programming) header or pins on the ATmega microcontroller.
- Select the Correct Board: In the Arduino IDE, go to "Tools" > "Board" and select the appropriate board. Choose the one that matches the ATmega microcontroller you are working with (e.g., "Arduino Uno" for ATmega328).
- Select the Programmer: Under "Tools" > "Programmer," choose your programmer (e.g., "Arduino as ISP" or "USBasp").
- Set the Port (if applicable): If you're using an Arduino as the programmer, select the COM port for the Arduino under "Tools" > "Port."
- Burn Bootloader: Go to "Tools" > "Burn Bootloader" in the Arduino IDE. This process will upload the Arduino bootloader to your ATmega microcontroller.
- Verify the Bootloader: After the bootloader is successfully installed, you can test it by uploading a simple Arduino sketch to the microcontroller using the Arduino IDE.
These steps may vary slightly depending on the specific programmer you are using and the version of the Arduino IDE. It's important to ensure that your connections are correct and that you've selected the right board and programmer settings in the IDE for a successful bootloader installation.
Conclusion:
The ATmega328 microcontroller, coupled with the Arduino bootloader, empowers hobbyists and makers to embark on exciting electronics projects. With the bootloader in place, you can easily program your ATmega328-based projects using the Arduino IDE, making the world of microcontrollers accessible to all.


